DoctorFrasierCrane (talk | contribs) (Incorporated a better style guide) Tag: Visual edit |
DoctorFrasierCrane (talk | contribs) mNo edit summary Tag: Visual edit |
||
| (9 intermediate revisions by the same user not shown) | |||
| Line 3: | Line 3: | ||
#<big>Read the '''[[Worlds Chat|Welcome Post]]''' for an understanding of our mission.</big> |
#<big>Read the '''[[Worlds Chat|Welcome Post]]''' for an understanding of our mission.</big> |
||
#<big>Entries must be as accurate and objective as possible. If you are not sure about whether something is accurate or objective, omit it from your contribution.</big> |
#<big>Entries must be as accurate and objective as possible. If you are not sure about whether something is accurate or objective, omit it from your contribution.</big> |
||
| + | #<big>Do not make an article about a single individual or group.</big> |
||
#<big>When contributing to a page, you must be logged in with a Fandom account. If possible, use your Worlds username as your Fandom username. Do not impersonate others.</big> |
#<big>When contributing to a page, you must be logged in with a Fandom account. If possible, use your Worlds username as your Fandom username. Do not impersonate others.</big> |
||
#<big>Disruptions, abusive language, and vandalism will not be tolerated. Follow the [[w:Fandom_Community_Guidelines|Fandom Community Guidelines]].</big> |
#<big>Disruptions, abusive language, and vandalism will not be tolerated. Follow the [[w:Fandom_Community_Guidelines|Fandom Community Guidelines]].</big> |
||
| Line 9: | Line 10: | ||
<br /> |
<br /> |
||
| − | == |
+ | =='''Style Guides'''== |
| − | === |
+ | ===Articles for Worlds=== |
| − | As a contributor, the easiest way to help us document |
+ | As a contributor, the easiest way to help us document worlds for historical preservation is by creating articles for the worlds from the [[Default Worlds|Default]] or [[User-Created Worlds|User-created]] worlds indexes. You can tell if an article has already been created for that world if the link is [https://en.wikipedia.org/wiki/Wikipedia:Red_link blue]. If the link is [https://en.wikipedia.org/wiki/Wikipedia:Red_link red], then that is an article that needs to be created according to the style guide here as well as this [[Template:World Example|'''template''']]. |
| + | {{World_Infobox|image1=InfoboxImageExample.png|title1=World Infobox Template|caption1=This world's image caption goes here.|author=Insert builder's name here.|worldsmark=The worldsmark should end in .world unless it's an official pre-installed world.}} |
||
| ⚫ | |||
| − | ==== |
+ | ==== '''Creating a new world article''' ==== |
| ⚫ | |||
| + | # First, sign into a Fandom account that preferably matches your Worlds username. |
||
| + | # Navigate to either the [[Default Worlds|Default]] or [[User-Created Worlds|User-created]] worlds index. |
||
| + | # Select a world whose link is in red that you'd like to fill out the [[Template:World Example|worlds article template]] for. |
||
| + | # Click the Edit button on the top right. |
||
| + | # Copy and paste the template into the Visual Editor. |
||
| + | # Fill it in with that world's information. |
||
| + | #Lastly, add the worlds [[#Infobox|Infobox]] template at the top. |
||
| + | <br /> |
||
| ⚫ | |||
| ⚫ | |||
| ⚫ | |||
| ⚫ | |||
If the article you are creating has a duplicate or similar title to an existing world article, add author or specification in parentheses: |
If the article you are creating has a duplicate or similar title to an existing world article, add author or specification in parentheses: |
||
| − | <code><u>'''World name (Author)'''</u></code><blockquote>Ex. Night Beach Gz (Softie)</blockquote><code><u>'''World name (subtitle or other specification)'''</u></code><blockquote>Ex 1. Polymatrix (Enter the Dragon) |
+ | <code><u>'''World name (Author)'''</u></code><blockquote>Ex. Night Beach Gz (Softie)</blockquote><code><u>'''World name (subtitle or other specification)'''</u></code><blockquote>Ex 1. Polymatrix (Enter the Dragon) |
| + | Ex 2. Aussie Adventure (Planet of the Pinks)</blockquote> |
||
| + | |||
| + | ==== '''Images''' ==== |
||
| + | |||
| + | *Try to include 2-3 images as a minimum in the image gallery for each world article. |
||
*Crop out unnecessary information before uploading, like chats and the Friends List |
*Crop out unnecessary information before uploading, like chats and the Friends List |
||
*Include a caption that describes its significance |
*Include a caption that describes its significance |
||
| − | *The template for a world article (whether [[Default Worlds|Default]] or [[User-Created Worlds|Custom]]) can be found [[Template:World Example|here]]. |
+ | *The template for a world article (whether [[Default Worlds|Default]] or [[User-Created Worlds|Custom]]) includes additional information on uploading images and can be found [[Template:World Example|here]]. |
| + | |||
| + | <br /> |
||
| + | |||
| + | ==== '''Infobox''' ==== |
||
| + | The world article should contain the World Infobox at the top. Adding an Infobox can be done a variety of ways. |
||
| + | |||
| + | <u>Easiest method: Visual Editor</u> |
||
| + | |||
| + | STEP 1: While editing the world article, click '''Insert > Infobox''' on the toolbar: |
||
| + | |||
| + | [[File:InfoboxStep1.png|frameless|265x265px]] |
||
| + | |||
| + | STEP 2: Select '''World Infobox''' from the list: |
||
| + | |||
| + | [[File:InfoboxStep2.png|frameless|272x272px]] |
||
| + | |||
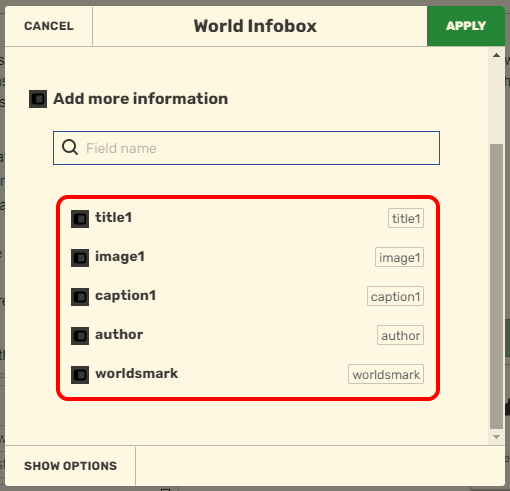
| + | STEP 3: Click '''add more information''': |
||
| + | |||
| + | [[File:InfoboxStep3.png|frameless|272x272px]] |
||
| + | |||
| + | STEP 4: Select each respective item and fill it out. |
||
| + | |||
| + | ''(Note that, in order for it to recognize an image in the image section of the Infobox editor, you will need to upload an image to the Wiki first. Then, simply write the filename of the image, like imagename.png.)'' |
||
| + | |||
| + | [[File:InfoboxStep4.png|frameless|270x270px]] |
||
| + | |||
| + | <u>Alternative method: Source Editor</u> |
||
| + | |||
| + | STEP 1: Visit the World [[Template:World Infobox|Infobox Template page]]. |
||
| + | |||
| + | STEP 2: Copy and paste that template into the article using the Source Editor. |
||
| + | |||
| + | STEP 3: Fill it out. |
||
| + | |||
| + | ''(Note that, in order for it to recognize an image in the image section of the Infobox editor, you will need to upload an image to the Wiki first. Then, simply write the filename of the image, like imagename.png.)'' |
||
| + | |||
'''''NOTE''': This wikipedia is not affiliated with Worlds Inc. The content and use reflect the contributions of members of the Worlds Chat community.'' |
'''''NOTE''': This wikipedia is not affiliated with Worlds Inc. The content and use reflect the contributions of members of the Worlds Chat community.'' |
||
| + | |||
| + | __NOTOC__ |
||
| + | __NOEDITSECTION__ |
||
| + | [[Category:Guidelines]] |
||
Latest revision as of 21:56, 21 June 2020
Guidelines
- Read the Welcome Post for an understanding of our mission.
- Entries must be as accurate and objective as possible. If you are not sure about whether something is accurate or objective, omit it from your contribution.
- Do not make an article about a single individual or group.
- When contributing to a page, you must be logged in with a Fandom account. If possible, use your Worlds username as your Fandom username. Do not impersonate others.
- Disruptions, abusive language, and vandalism will not be tolerated. Follow the Fandom Community Guidelines.
- Things are easier to learn if they're organized in a consistent way. Please follow our style guides below.
Style Guides
Articles for Worlds
As a contributor, the easiest way to help us document worlds for historical preservation is by creating articles for the worlds from the Default or User-created worlds indexes. You can tell if an article has already been created for that world if the link is blue. If the link is red, then that is an article that needs to be created according to the style guide here as well as this template.
Creating a new world article
- First, sign into a Fandom account that preferably matches your Worlds username.
- Navigate to either the Default or User-created worlds index.
- Select a world whose link is in red that you'd like to fill out the worlds article template for.
- Click the Edit button on the top right.
- Copy and paste the template into the Visual Editor.
- Fill it in with that world's information.
- Lastly, add the worlds Infobox template at the top.
Titles
The article title should match the name of the world on the Index:
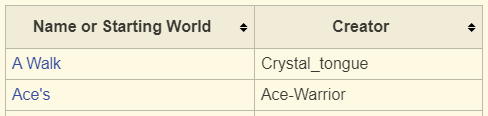
In the case of the user-created worlds index, the name of the world is on the left side and the creator on the right side.
Duplicates
If the article you are creating has a duplicate or similar title to an existing world article, add author or specification in parentheses:
World name (Author)
Ex. Night Beach Gz (Softie)
World name (subtitle or other specification)
Ex 1. Polymatrix (Enter the Dragon) Ex 2. Aussie Adventure (Planet of the Pinks)
Images
- Try to include 2-3 images as a minimum in the image gallery for each world article.
- Crop out unnecessary information before uploading, like chats and the Friends List
- Include a caption that describes its significance
- The template for a world article (whether Default or Custom) includes additional information on uploading images and can be found here.
Infobox
The world article should contain the World Infobox at the top. Adding an Infobox can be done a variety of ways.
Easiest method: Visual Editor
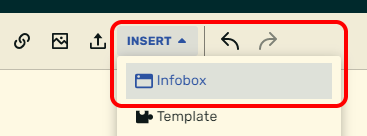
STEP 1: While editing the world article, click Insert > Infobox on the toolbar:
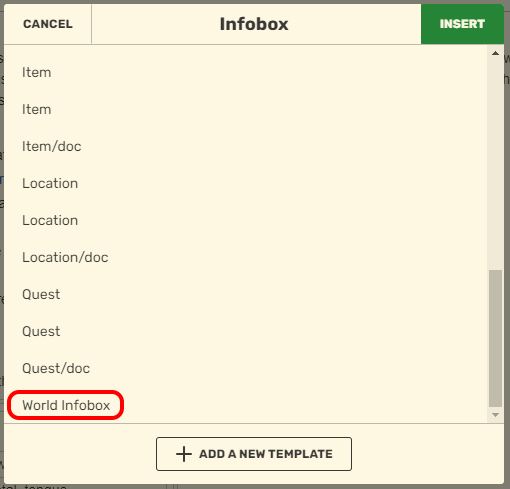
STEP 2: Select World Infobox from the list:
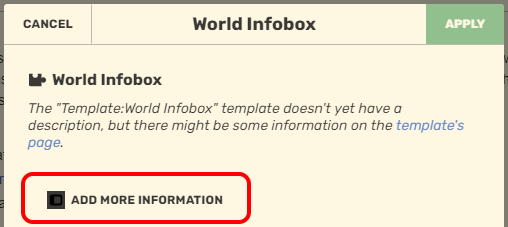
STEP 3: Click add more information:
STEP 4: Select each respective item and fill it out.
(Note that, in order for it to recognize an image in the image section of the Infobox editor, you will need to upload an image to the Wiki first. Then, simply write the filename of the image, like imagename.png.)
Alternative method: Source Editor
STEP 1: Visit the World Infobox Template page.
STEP 2: Copy and paste that template into the article using the Source Editor.
STEP 3: Fill it out.
(Note that, in order for it to recognize an image in the image section of the Infobox editor, you will need to upload an image to the Wiki first. Then, simply write the filename of the image, like imagename.png.)
NOTE: This wikipedia is not affiliated with Worlds Inc. The content and use reflect the contributions of members of the Worlds Chat community.